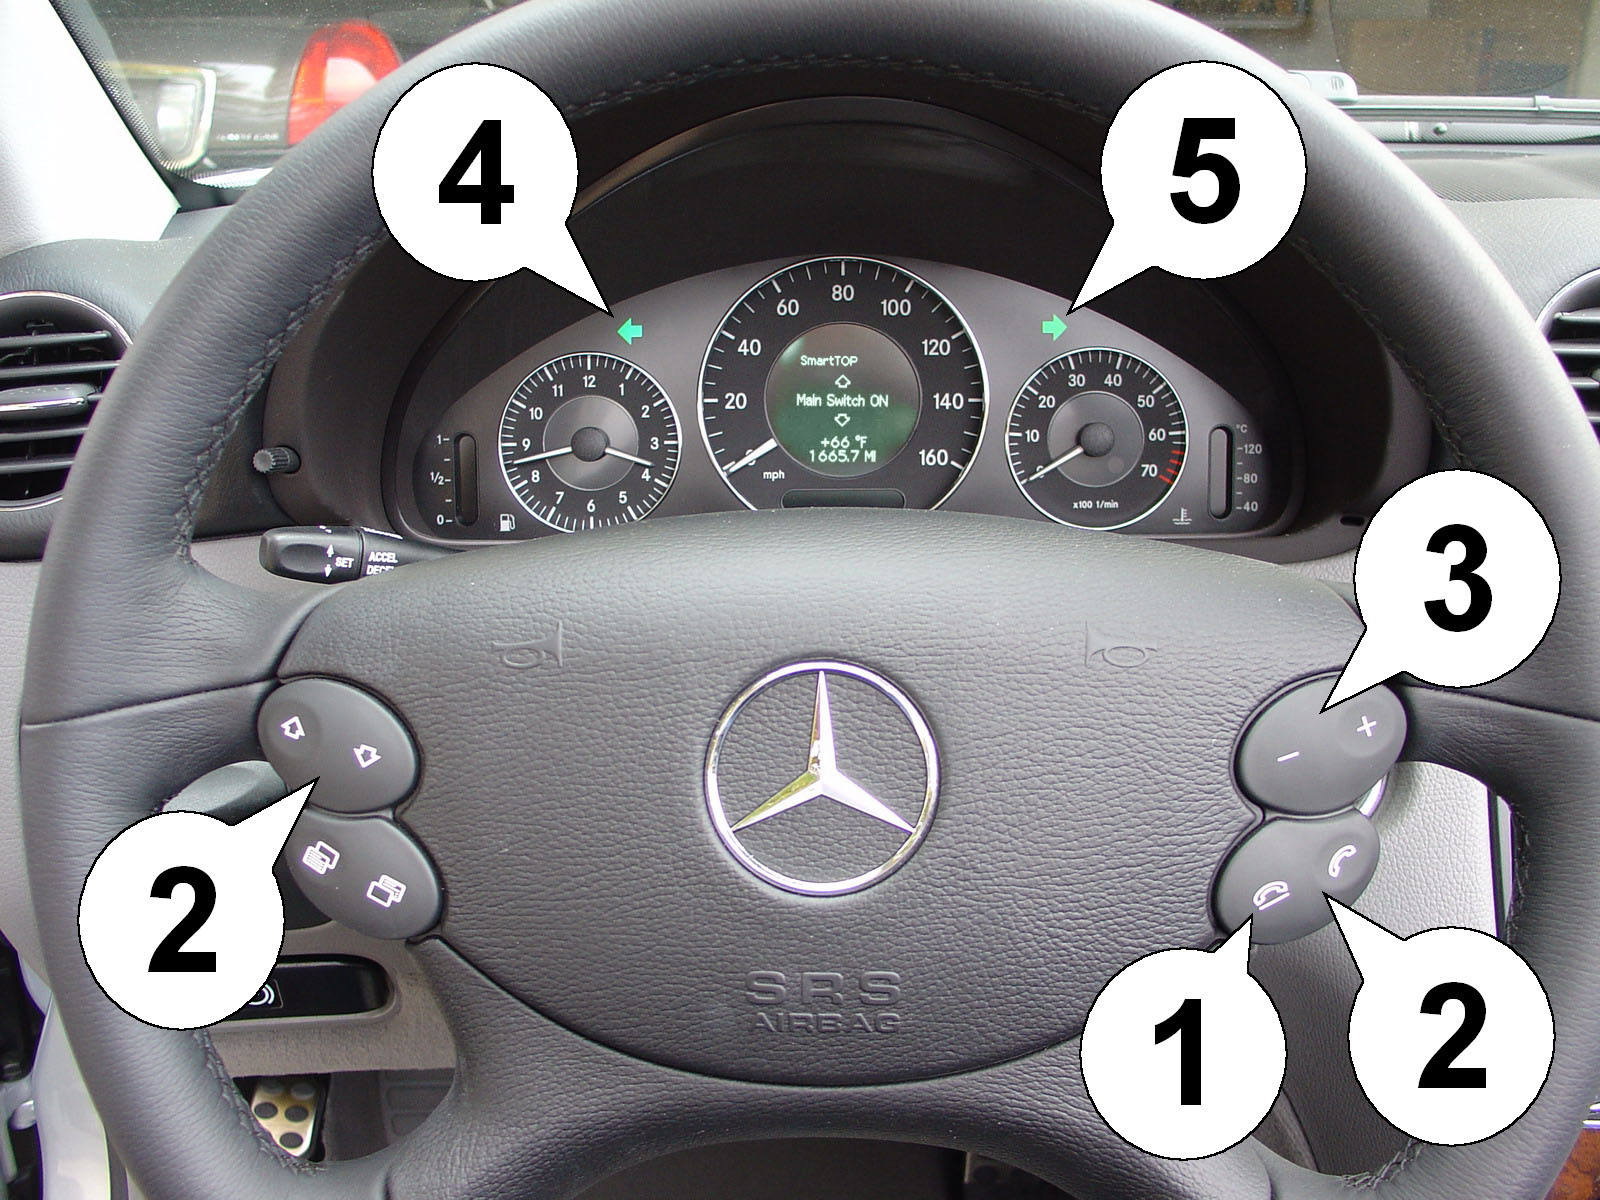
Function 1 - Main Switch - Workshop and Diagnostics ( 0=OFF / *1=ON / 2=NO HAZARDS )
The module can quickly and easily be enabled and disabled using this function. It acts like a master switch. When disabled, the module becomes completely inactive and behaves as if it was not installed.
Setting 0 disables the entire module while keeping all other function settings intact. This allows turning the module off and back on without the need to reconfigure all of the other user configurable settings.
Setting 2 disables blinking of the hazards during remote operation.
IMPORTANT: In order to avoid problems with diagnostic tools and to avoid confusion or injury by unexpected top movement, we urge you to ALWAYS DISABLE the module before taking the car to a shop or lending it to a third person!
If problems with the top arise while the module is installed, ALWAYS contact Mods4Cars first at www.mods4cars.com. NEVER take the car to a dealer without getting support first!
Function 2 - One-Touch top operation ( 0=OFF / *1=ON WU / 2=ON WD / 3=EXT WU / 4=EXT WD )
This function enables one-touch console switch operation, for which the window position after top open as well as an optional extended convenience mode can be programmed.
Setting 1 is standard one-touch mode with windows up (WU) after top open.
Setting 2 is standard one-touch mode with windows down (WD) after top open.
Settings 3 and 4 (EXTENDED) are the same as 1 and 2 respectively, but it is possible to turn the ignition off and pull the key out while the top operation continues. It is also possible to get out of the vehicle and lock the doors using the remote while the top is still closing.
Settings 3 and 4 require extra responsibility and caution to avoid injury by moving top parts to passengers not expecting the top to continue running after the engine is turned off!
Top operation with the console switch:
Holding down the switch (>2 sec) in either direction will operate the top in manual mode for as long as the switch is held.
Tap open 1x to open the top and bring the windows into the selected position (WU=Windows Up, WD=Windows Down).
Tap open 2x to open the top and bring the windows into the opposite position this one time (Down on settings 1 and 3, Up on settings 2 and 4).
Tap open 2x QUICKLY (like a mouse double-click) to automatically lower windows (SLK) / raise windows (CLK,SL).
Tap close 1x to close top and windows.
Tap close 2x to close only the top and leave the windows open.
Tap close 2x QUICKLY (like a mouse double-click) to automatically raise windows (SLK) / lower windows (CLK,SL).
Tap in the opposite direction at any time for emergency stop.
PLEASE NOTE: On CLKs model year 2004 the top can be operated while driving, but not using the "one-touch" feature. This is due to the way the top button is directly wired to the top controller on this model only.
Function 3 - Remote Control ( 0=OFF / *1=ON WU / 2=ON WD / 3=EXT WU / 4=EXT WD )
This function allows full automatic top operation with the original remote fob by pressing the lock and unlock buttons.
Also here it is possible to determine (independently from operation via the center console switch) the position of the windows after opening the top.
Setting 1 is standard remote mode with windows up (WU) after top open.
Setting 2 is standard remote mode with windows down (WD) after top open.
Settings 3 and 4 (EXTENDED) are the same as 1 and 2 respectively, but it is possible to turn the ignition on and start the engine while the top still continues. Additionally locking the doors by remote will not interrupt an ongoing top operation.
Settings 3 and 4 require extra responsibility and caution to avoid injury by moving top parts, as locking (previously unlocked) doors with the remote will not stop the top!
Top operation with the remote fob:
Tap unlock on the remote 2x (in 1 sec intervals) to open all windows.
Tap unlock on the remote 3x (in 1 sec intervals) to open the top and bring the windows into the selected position (WU=Windows Up, WD=Windows Down).
Tap unlock on the remote 4x (in 1 sec intervals) to open the top and and bring the windows into the opposite position this one time (Down on settings 1 and 3, Up on settings 2 and 4).
Tap lock on the remote 2x (in 1 sec intervals) to close all windows.
Tap lock on the remote 3x (in 1 sec intervals) to close top and windows.
Tap lock on the remote 4x (in 1 sec intervals) to close top and leave windows down.
Tap any direction to stop an ongoing operation. To stop the top in extended mode in any door lock state, tap the same direction twice!
IMPORTANT: With sequential unlocking enabled (first driver's door, then all others) it is necessary to add one key press to the sequence when tapping the UNLOCK button (1x = Driver's door unlocks, 2x = All doors unlock, 3x = Windows roll down etc.)
Function 4 - Maximum allowed speed for top operation ( *0=0kmh / 1=10kmh / 2=20kmh / 3=30kmh / 4=40kmh / 5=50kmh / 6=60kmh)
Setting the max allowed speed for top operation in steps of 10km/h (~7mph). Setting 0 only allows top operation while halted.
WARNING: Once the top is started within the programmed speed limit, it will continue running, even if the speed later exceeds the limit during the top operation!
Function 5 - Automatic power locks ( 0=OFF / 1=LOCK ONLY / *2=KEY OUT / 3=IGNITION OFF )
This function can be set to automatically lock the doors when driving (setting 1) and additionally unlock the doors automatically, when either the key is pulled from the ignition lock (setting 2) or when the ignition is turned off (setting 3).
Function 6 - Chirp Sound on lock/unlock ( *0=OFF / 1=HORN L / 2=HORN U / 3=HORN L+U / 4=SIREN L / 5=SIREN U / 6=SIREN L+U )
This function can be set to either chirp once when locking the car (setting 1) or chirp twice when unlocking (setting 2) or both (setting 3). Setting 1-3 use the regular horn, setting 4-6 use the alarm siren (requires factory alarm with red "panic" button on the remote fob).
To enable the horn chirps on SLK and CLK, a fuse needs to be reseated in the engine compartment fuse box. Please see the installation manual for details.
Function 7 - HomeLight XL ( *0=OFF / 1=FOG / 2=DIPPED BEAM ) - SLK/CLK ONLY
This function turns the headlights on for 30 sec., when either the PANIC button on the remote (if present) is tapped briefly or the OPEN button is tapped once while the car is already open (or CLOSE button while the car is already closed). To turn the light off manually, just tap the button again. Setting 1 activates the fog lights and setting 2 activates the regular dipped beams as the light source.
PLEASE NOTE: On the SL this function always uses all turn signal lights.
Function 8 - Daytime Driving Lights ( *0=OFF / 1=FOG / 2=LOW BEAM ) - SLK/SLK ONLY
Enable this function to turn the fog lights or headlights (low beams) on as soon as the engine is started. Some countries require the front lights to be permanently on.
PLEASE NOTE: On the SL this function DOES NOT work and the setting is ignored.
WARNING: This function ONLY ACTIVATES THE FRONT LIGHTS !!! You have to make sure that you still turn the light switch if you drive at night, since this function will NOT activate any rear lights or dash board illumination!
Function 9 - Rear Windows ( *0=OFF / 1=ON )
This function allows raising the small rear windows when the top is down. When activated, all windows will close (instead of just the front ones) when using the quick top switch double click or the remote.
Function 10 - Keyless Go top operation ( *0=OFF / 1=ON ) - SL ONLY
This function allows to close and open the convertible top by touching the rectangular button on the door handle three times in a row (requires Keyless Go option!). Tap the button very slowly with about 2 seconds in between as is has a very long "dead time" between activations.
If the top is fully closed, activating this function will open the top and bring the windows into the position selected in fn. 3
If the top is open or half-way closed, activating this function will fully close the top and windows.
Function 3 (Remote Control) must be enabled for this function to work.
|