OPERATION AND PROGRAMMING

STLFBW3

Comfort Roof Control Module designed for

• BMW 3 Series Convertible (E93)
• BMW Z4 Roadster (E89)


Firmware v2.20 and up


Further information and manuals for all products can be found on our web site

w w w . m o d s 4 c a r s . c o m

 
PLEASE READ THE COMPLETE MANUAL CAREFULLY BEFORE USING THIS PRODUCT.

We explicitly point out that all functions of this control unit should be used only while exercising caution and responsibility. We can NOT be held liable for any damage or injury caused by installing or using this product. Operation must be supervised and paid attention to in order to ensure that there are no objects or persons in range of moving parts due to the fact that top mechanics do not have pinch protection. Please study and be aware of the procedures to interrupt an ongoing operation in an emergency.
Important Information. READ BEFORE USING!
PRINTING THIS MANUAL
This manual is designed to produce completely filled pages. In order to get best print results, simply set the borders to minimum settings in the browser's page setup menu and disable headers and footers.

Activate the print preview and if necessary decrease the zoom level until all pages are shown correctly.

ALL IMAGES CAN BE CLICKED FOR FULL SIZE in the browser.
TROUBLE SHOOTING - NEED TO CONTACT US?
If you run into any problems after installing the module, please go over the manual again in great detail, clicking every photo for full size!
We now have a full Knowledge Base with Support Ticket system available online at www.mods4cars.com/support

If you need to contact us, the best and fastest way to do so is by opening a support ticket there

This module comes with our USB Field Upgrade and Configuration Port! We recommend connecting it to a computer BEFORE YOU INSTALL and using our support app "m4cconnect" to do a quick firmware update check. M4cconnect as well as all other information regarding USB update and configuration can be found at www.mods4cars.com/usb. You can even configure and activate your favorite module functions and settings on screen before the module is installed in the car! It is a good idea to permanently install the USB cable with the module in the car, leaving the computer plug in an easily accessible spot for later use with a Wifi/3G/4G connected laptop.
Detailed function description (Factory setting underlined)
Function 1 - MODULE MODE + MASTER SWITCH ( 0=OFF / 1=ON / 2=EXT / 3=EXP )

The module can quickly and easily be enabled and disabled using this function. It acts like a master switch. When disabled, the module becomes completely inactive and behaves as if it was not installed while keeping all other function settings intact for when it is re-enabled later.

• Setting 1 is the regular operation mode with emphasis on safety. Turning the ignition on or off as well as hitting any button on the remote at any time during remote operation immediately stops an ongoing top operation.
• Setting 2 is the extended operation mode with emphasis on convenience. Starting or stopping the engine will not stop a top operation and it is possible to lock or unlock the doors one time from the remote while the top is moving.
• Setting 3 is the operation mode designed for responsible experts. It allows the doors to be locked and unlocked more than once. This can come in handy if after getting out and locking the doors something was forgotten in the car and needs to be retrieved while the top is still running.

Settings 2 and 3 require extra responsibility and caution to avoid injury by moving top parts to passengers not expecting the top to continue running after the engine is turned off and due to the fact that the first key press on the remote to lock or unlock the doors (or continued toggling of the door locks) will not stop the top! To abort the operation, press unlock while the doors are unlocked or lock while they are locked.

EXTREMELY IMPORTANT: In order to avoid problems with diagnostic tools and to avoid confusion or risk of injury by unexpected top movement, we urge you to ALWAYS DISABLE the module before taking the car in for routine maintenance or lending it to a third person! In case of any top malfunction NEVER take the car with the module still installed to an unsuspecting dealer! In such cases ALWAYS contact Mods4Cars for support first at www.mods4cars.com or completely uninstall the module before a dealer visit.


Function 2 - Console Switch One-Touch ( 0=OFF / 1=ON / 2=VALET )

This function allows full automatic top operation using the console switch.

• Setting 1 enables One-Touch operation and comfort close for all windows.
• Setting 2 disables opening of the top (Valet Mode), even from the remote!

IMPORTANT: Setting 2 disables top operation completely! If the top unexpectedly does not work, check and make sure VALET mode is not turned on.

Top operation with the console switch:
• Holding down the switch (longer than 1 sec) in either direction will operate the top in manual mode for as long as the switch is held.
• Tap open 1x: Open the top and bring the windows into the programmed position.
• Tap open 2x: Open the top and bring the windows into the opposite position this one time.
• Tap close 1x: Close top and windows.
• Tap close 2x: Close only the top and leave the windows open.

Comfort close for all windows:
• Tap the top close switch while the top is already closed to roll all windows up.

To interrupt an ongoing operation: Tap the console switch in any direction at any time - even if the top was started by remote!


Function 3 - Console Switch Invert ( 0=OFF / 1=ON )

This function allows reversing the direction of the console switch.

• Setting 1 activates reversed direction operation.


Function 4 - Maximum Speed ( 0=0 km/h / 1=10 km/h / 2=20 km/h / 3=30 km/h / 4=40 km/h )

This function determines the desired speed limit for top operation via console switch.

• Setting 0 only allows roof operation while halted.
• Setting 1 and up increase the speed for top operation in steps of 10km/h (~7mph).

We recommend to keep the speed as low as possible and only operate the top on even and smooth street surfaces!
Once the top is started within the programmed speed limit, it will continue running, even if the speed later exceeds the limit during the top operation!


Function 5 - Remote Top ( 0=OFF / 1=HOLD / 2=TAP / 3=BOTH )

This function allows full automatic top operation with the original remote fob by pressing the lock and unlock buttons.

• Setting 1 (Hold) allows opening and closing of the top by holding down the unlock and lock buttons on the remote.
• Setting 2 (Tap) allows opening and closing of the top by tapping the unlock and lock buttons on the remote multiple times.
• Setting 3 (Both) allows both of the methods to be used.

Top operation with the remote fob using HOLD:
• Hold unlock down for about 4 sec: Open the top and bring the windows into the programmed position.
• Hold unlock down for about 4 sec, let go and tap open again briefly: Open the top and bring the windows into the opposite position.
• Hold lock down for about 4 sec: Close top and windows.
• Hold lock down for about 4 sec, let go and tap close again briefly: Close only the top while leaving the windows down.

• With the top already fully open, hold the open button down for about 4 sec.: Top lifts itself out of the trunk (Like factory trunk access feature "tap trunk button twice and hold").

Top operation with the remote fob using TAPS:
• Tap unlock 3x in 1 sec intervals: Open the top and bring the windows into the programmed position.
• Tap unlock 4x in 1 sec intervals: Open the top and bring the windows into the opposite position this one time.
• Tap lock 3x in 1 sec intervals: Close top and windows.
• Tap lock 4x in 1 sec intervals: Close only the top while leaving the windows down.

• With the top already fully open, tap the open button 3x: Top lifts itself out of the trunk (Like factory trunk access feature "tap trunk button twice and hold").

Trunk Confort Access when top is open (Always active in Setting 1, 2 or 3):
• Tap Trunk button 2x: Top automatically lifts itself out of the trunk, no need to hold down the trunk button.

To interrupt an ongoing operation: Tap unlock or lock again. IMPORTANT: Keep in mind that Extended and Expert modes allow one time change (or multiple changes) of the door locks! In such case a second key press on the same button will be necessary to stop the top.

IMPORTANT: If the driver's window suddenly rolls up after having used any of the opening operations (2x or 3x tap) and closing the driver's door, then the BMW factory "comfort entry" feature is active and should be deactivated. It's a feature activated by multiple taps on the unlock button and designed to lower the window when getting in and raise it once the door is closed. Usually it can be disabled in the iDrive settings.


Function 6 - Remote Windows ( 0=OFF / 1=HOLD / 2=TAP / 3=BOTH )

This function allows separate control of the windows with the original remote fob by pressing the lock and unlock buttons.

• Setting 1 (Hold) allows opening and closing of the windows by holding down the unlock and lock buttons on the remote.
• Setting 2 (Tap) allows opening and closing of the windows by tapping the unlock and lock buttons on the remote multiple times.
• Setting 3 (Both) allows both of the methods to be used.

Window operation with the remote fob using HOLD:
• Hold unlock down for about 2 sec: Open all windows.
• Hold lock down for about 2 sec: Close all windows.

Window operation with the remote fob using TAPS:
• Tap unlock 2x in 1 sec intervals: Open all windows.
• Tap lock 2x in 1 sec intervals: Close all windows.

IMPORTANT: If there are undesirable side effects when using TAPS (such as driver's window closing by itself when closing the door) then it means the factory "easy entry" feature is active and should be turned off by a dealer or shop. Otherwise simply program this function to HOLD mode (Setting 1).


Function 7 - Keyless Top ( 0=OFF / 1=CLOSE ONLY / 2=OPEN/CLOSE )

This function allows to close and open the convertible top by touching the door handle (requires Keyless Entry option!)

• Setting 1 only allows closing the top.
• Setting 2 allows closing and opening.

Top operation with the Keyless Entry door handle:
• Tap thumb on lock sensor 2x slowly, then hold hand inside door handle: Open the top and bring the windows into the programmed position.
• Tap thumb on lock sensor 3x slowly: Close top and windows.

• Make sure to leave about 2 seconds between taps and that there is a clicking sound after each tap. Otherwise the input was not recognized.

To stop an ongoing operation: Tap the lock sensor again. Keep in mind that Extended and Expert modes allow unlocked doors to be locked while the top continues. In such case tap the lock sensor a second time.


Function 8 - Window positions after opening top ( 0=NONE / 1=FRONT / 2=ALL )

This function determines the position of the windows after an automatic top opening run.

• Setting 0 leaves all windows down.
• Setting 1 raises the front windows only.
• Setting 2 raises all windows.


Function 9 - Window switch One-Touch ( 0=OFF / 1=ON / 2=NO IGNITION )

This function allows to program the big all-windows switch in the driver's door to raise all windows using One-Touch. By factory this switch only offers One-Touch down.

• Setting 1 allows One-Touch closing of all windows with the ignition on.
• Setting 2 additionally allows closing all windows with the switch after the ignition has been turned off and the driver's door has been opened.

To close all windows at the same time, pull this switch up briefly and let go. To interrupt an operation, tap the switch again in any direction.


Function 10 - Automatic Door Unlocking ( 0=OFF / 1=KEY / 2=IGN )

This function can be set to automatically unlock the doors when either the key is pulled from the ignition lock (or turned off completely on keyless models) or when the engine is turned off. This removes the requirement to pull the door handles twice to get out of the car.

• Setting 1 unlocks the doors after the key is pulled from the ignition lock (ignition fully off).
• Setting 2 unlocks the doors when the engine is turned off (ignition in ACC position or fully off).


Function 11 - Sequential unlock with door handle ( 0=OFF / 1=ON / 2=ALWAYS )

This function allows using the touch door handle to unlock the passenger door, if the car is equipped with the comfort access touch handles (keyless entry) and programmed to only unlock the driver's door when unlocking via door handle.

• Setting 1 enables the unlocking sequence via door handle (see below).
• Setting 2 always unlocks both doors when touching the door handle. The remote's factory behavior remains unchanged: The first tap unlocks the driver's door only. A second tap will unlock the passenger door.

Unlocking all doors by touch sequence (Setting 1):
Touch the lock surface first (a click from door locks must be audible), then wait 3 sec and touch the unlock surface inside the handle to unlock both doors at once.


Function 12 - Folding Mirrors ( 0=OFF / 1=HOLD / 2=TAP / 3=ALWAYS / 4=ALWAYS IN/OUT )

This function allows remote control of the motorized mirrors (factory option motorized mirrors required). The mirrors always fold back out when opening any door.

• Setting 1 will fold the mirrors in when the round lock button on the remote is held down for about 2 seconds when locking the car.
• Setting 2 will fold the mirrors in when either the round lock button on the remote or the "lock" surface on the touch door handles is tapped twice within 5 seconds.
• Setting 3 will fold the mirrors in automatically when locking the car.
• Setting 4 will fold the mirrors in automatically when locking the car and out immediately when unlocking.

It is possible to program this function and remote window control (function 6) to the same operation method (Tap or Hold). If it is not desired to trigger both at the same time, simply program this function to the opposite operation method (Hold vs Tap) instead.

IMPORTANT: There is only ONE command to toggle the mirror state and no current position feedback from the mirror motors. The module needs to memorize the last known position and it is possible that the mirror position gets out of sync (folded out when they should be folded in or vice versa). In such case simply tap the mirror fold button in the driver's door to toggle the current position.


Function 13 - Park Assist ( 0=OFF / 1=RIGHT / 2=LEFT )

This function automatically lowers one of the mirrors when shifting into reverse which makes it a lot easier to see the curb or other obstacles.

• Setting 1 lowers the right mirror.
• Setting 2 lowers the left mirror.

IMPORTANT: This function is meant only for models WITHOUT the factory park assist feature and should stay disabled on cars that already have this feature built-in.


Function 14 - Calibration ( 0=-4 / 1=-3 / 2=-2 / 3=-1 / 4=0 / 5=+1 / 6=+2 / 7=+3 / 8=+4 )

This function is for calibrating the park assist feature. Since vehicles without the factory option do not have position encoders or memory in the mirror motors, our park assist feature has to rely on precise timing only. Unfortunately some inaccuracy is unavoidable. In some cases the mirror may return too high or too low.
This calibration value helps in finding a timing that returns the mirror to a position that is close enough to the original position. The higher the setting is programmed here, the higher the position is the mirror will return to.


Function 15 - Block Factory Commands ( 0=OFF / 1=ON )

This function attempts to block the factory "raising or lowering of the windows by remote" command present on some models when using the HOLD mode for the top.

• Setting 1 enables this function.

On some models it is possible from the factory to hold down the remote to lower or raise the windows. This interferes with the module's way to control the convertible top when using the HOLD method and for example would start raising the windows prematurely when holding the lock button on the remote in order to close the top.
This function is not guaranteed to be compatible with all cars, so if there are side effects like stuttering windows, please leave it disabled and instead use TAPS to control the top from the remote.


Programming
This module offers several different functions, each with several settings. All functions and settings are described in detail above and a quick reference table (matrix) can be found at the end of this manual. We recommend printing the matrix and storing it in the glove box!
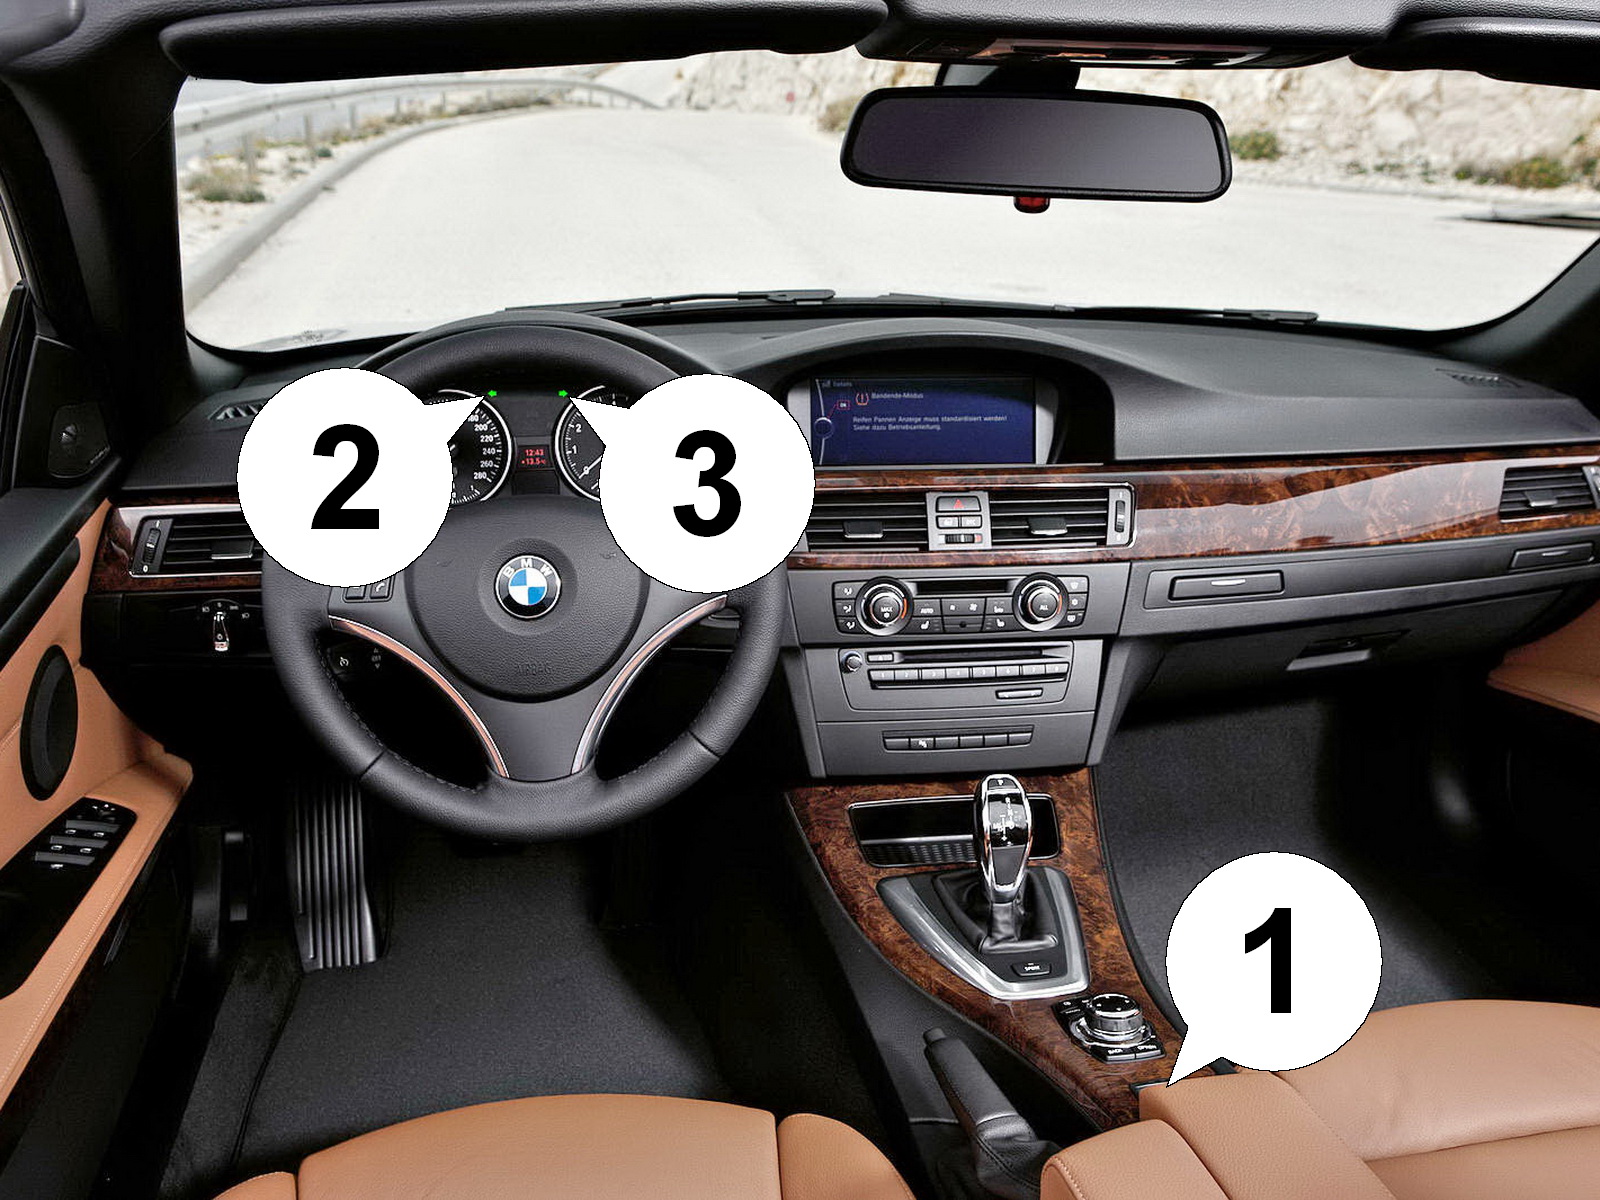
To activate the programming mode, turn the ignition fully ON (no need to start the engine), then hold down the convertible top switch (1) in the direction the top is already in (open when the top is open, close when the top is closed) until both blinker arrows in the cluster light up. Now let go.
The module shows the current function via the left arrow (2) and that function's setting via right arrow (3). As an example, the left arrow blinks 1x and the right arrow blinks 2x: Function 1 is currently set to setting 2.
To select the function, tap the top switch briefly. To change the setting of the selected function, hold the switch for about 1 sec. A brief tap on the top open switch advances to the next function, a brief tap on the top close switch returns to the last one. After reading the current function and setting via the blinker signals, a long tap on the top open switch increases the setting while a long tap on the top close switch decreases it.

To end programming mode, either turn the ignition off or hold down the top switch in either direction for a longer time (about 5 sec) until both arrows light up. Programming mode also terminates automatically after 60 sec. of inactivity.

• Shortcut to toggle Main Switch: With the ignition on as above, hold and keep the top switch pressed in the direction the top is already in (ignoring the first blinker signal) for a full 10 seconds, until the left arrow blinks once by itself. The right arrow will then indicate the Function 1 (Main Switch) setting (no blinks=OFF, 1x=ON, 2x=EXT, 3x=EXP).
• Shortcut to toggle Valet Mode: With the ignition on as above and the top closed, tap the top-close switch quickly 10 times in a row, until the left arrow blinks twice by itself. The right arrow will then indicate the Function 2 (One Touch) setting (no blinks=OFF, 1x=ON, 2x=VALET).
Function/Setting Matrix (green fields are defaults)
Product: STLFBW3 - SmartTOP for BMW 3 Series Convt. (E93) and Z4 Roadster (E89)
Firmware: v2.20 and up
SETTING 0SETTING 1SETTING 2SETTING 3SETTING 4SETTING 5SETTING 6SETTING 7SETTING 8
Function 1 OFFONEXTEXP
MODULE MODE +
MASTER SWITCH
Module DisabledModule EnabledExtended Mode
READ MANUAL!
Expert Mode
READ MANUAL!
Function 2 OFFONVALET
Console Switch
One-Touch
Factory behaviorOne-Touch operationValet Mode
Function 3 OFFON
Console Switch
Invert
Factory BehaviorSwitch inverted
Function 4 0 km/h10 km/h20 km/h30 km/h40 km/h
Maximum SpeedOnly while halted10 km/h (~7mph)20 km/h (~13mph)30 km/h (~19mph)40 km/h (~25mph)
Function 5 OFFHOLDTAPBOTH
Remote TopNo remote functionsHold remote for 3 sec.Tap remote 3xHold and Tap enabled
Function 6 OFFHOLDTAPBOTH
Remote WindowsNo remote functionsHold remote for 2 sec.Tap remote 2xHold and Tap enabled
Function 7 OFFCLOSE ONLYOPEN/CLOSE
Keyless TopFactory behaviorTop can be closedTop can be opened and closed
Function 8 NONEFRONTALL
Window positions
after opening top
All windows downFront windows upAll windows up
Function 9 OFFONNO IGNITION
Window switch
One-Touch
Factory behaviorOne-Touch operationIgnition off allowed
Function 10 OFFKEYIGN
Automatic Door UnlockingFactory behaviorUnlock doors when key is pulledUnlock doors when ignition is turned off
Function 11 OFFONALWAYS
Sequential unlock
with door handle
Factory behaviorUnlock Sequence via HandleAlways Unlock via Handle
Function 12 OFFHOLDTAPALWAYSALWAYS IN/OUT
Folding MirrorsDisabledHold button brieflyTap button 2xAlways fold inAlways fold in/out
Function 13 OFFRIGHTLEFT
Park AssistDisabledRight MirrorLeft Mirror
Function 14 -4-3-2-10+1+2+3+4
CalibrationShortest TimerCalibration in 8 steps (4 is neutral)Longest Timer
Function 15 OFFON
Block Factory CommandsFactory behaviorEnabled